
MIRACLE WARRIORS - SEAL OF THE DARK LORD
Page 4
|
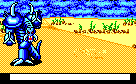
You should now find yourself
on the plains of Brontes, on Areos. Here is one of the new creatures you
can expect to meet:

|
Gatanotow. A relatively
easy opponent, worth 38 Fangs & +35 Charisma. |
Apart from the Gatanotow,
most of the rest of the creatures that you meet on the plains you will
have already come across. Head in a North Westerly direction and you should
find the town of Tegea:
| 1. |
A man giving the towns
name. |
| 2. |
A healer (restores health
for a price and will sell herbs at 2000 Guilders for 5 herbs). |
| 3. |
Fang buyer (1 fang =
50 Guilders). |
| 4. |
Weaponsmith. |
| 5. |
Town Elder. For a donation
of 500 Guilders, you are told the following: "Beware the evil hordes' traps!". |
| 6. |
The occupant tells you:
"Areos' Sea Dragons have restoring potions." |
| 7. |
The occupant tells you:
"Magic spheres are found in a desert village." |
| 8. |
The occupant tells you:
"I heard Iasons Monument is in Areos' desert." |
| 9. |
Shop:
| Knife |
3000 Guilders |
| Sword |
4000 Guilders |
| Armour |
5000 Guilders |
| Shield |
6000 Guilders |
| Feather |
3000 Guilders |
|
This is your base of operations
on Areos, so heal the party and stock up on supplies. |

 |
|
Another Trip Into The Desert
|
From Tegea, head West
and slightly North. You should find yourself in a narrow strip of plain
with desert to the North and South. This is the land of Kilix. Place your
party one square West of the Westernmost mountain bordering the Northern
desert and then head North. You should quickly arrive in a village where
you will be greeted by the village elder...
"Impetuos Youth! I will
trade for 1000 Fangs, no less."
If you agree to this
high price you will be given a White Sphere and be told the following:
"This Sphere contains
infinite power. Rub it, and no evil being can stand up to ye by itself."
You have just gained
an incredibly powerful weapon, but, alas, you can only carry one at a time.
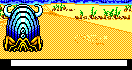
There are a couple of new creatures in this desert:
 |
Desert Wanderer. A fearsome
opponent with the ability to cast flame spells. Worth 60 Fangs and +50
Charisma. |
 |
Gijim. Not too much hassle.
Worth 32 Fangs and +90 Charisma. |
Well, thats it for the preparation.
You should now be ready to embark on the last part of your Great Campaign.
You are ready to fight for the three keys which will allow you access to
Terarin in the Final Battle. But where can you find the keys? |
The scroll has the clues
you need to find the Three Keys which are hidden and guarded in the continent
of Areos. You know from the first line that you need to travel eight days
South, towards the smell of Spring's sweetness that travels on the South
wind. If you travel eight squares South from Tegea you will find a monument,
but stopping here reveals nothing except the sound of laughter. Travel
eight squares West (Face Not Dawn is the next line of the scroll remember)
and you will find another monument where again all you hear is laughter.
Travel North five squares and the same happens at another monument. Head
West for three squares and you will find yet another monument. Surely something
will happen here, as this is the end of the instructions given in the scroll?
Well, there is no laughter this time, instead you get to fight a Basailz:-
 |
Basailz. Very easy to
defeat, and you gain +1000 Charisma. |
After defeating this strange
creature you will get the following message:
"The Basailz is dead!
There's a small box! Open it!" and so you do:-
"Fools! The Seal Of The
Dark Lord waits not for thou here!" whereupon your party suffers a small
amount of damage, but then receives the following message:-
"Thou hast badly injured
the Black Monk and his retainer."
Looks like you've done
some good even though the trail of the Keys has gone cold. I was stuck
at this point for several years, wondering how to get into the monuments,
but a chance discovery enabled me to unlock the secret of the scroll. The
secret is this: Each square on the map represents HALF a days travel. So
return to Tegea, stock up on herbs and head SIXTEEN squares South instead
of eight. You will find yourself on a patch of desert surrounded by
mountains. Searching here will reveal a monument. Cast the spell "Come,
Iason" and you are in!
Well, some of you out
there are smarter than me, and have managed to work out the secret of the
scroll in the way the programmers intended! If you remember, a few of the
characters you will have met on your travels will have left messages such
as "Thou art only about half as big as Iason!" and "Iason was twice as
fast as a normal man and of great stature." Using this information you
should be able to deduce that Iason could traverse the land twice as fast
as you and therefore you will need to travel for twice as long - 16 squares
to Iasons 8! Seems so obvious now! Thanks to Furnace17 for that tip. |
|
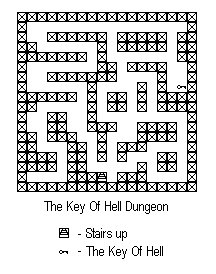
Finding The Keys! Part One
|
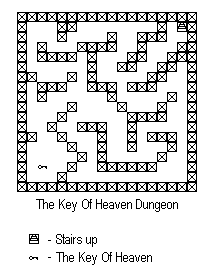 |
You now find
yourself in the underground dungeon shown on the left. The denizens of
this dungeon are all creatures you will have met before - long ago. Remember
creatures such as the Cavern Mantis & Orin? well this place is full
of them. You should have no problem making your way to the key. It is visible
on the screen as a treasure chest, but when you open it you meet the following
creature:
 |
Rokhod. Use your Staff's
then polish it off with your swords. Your bounty? The Key of Heaven (and
-1000 Charisma points, ouch!) |
Once you've got the key,
fight your way back to the surface - easy! Now head back to Tegea and get
the party healed and stocked up on herbs. Cross the sea to replenish any
other consumables, then head back to Tegea. |
From Tegea, you need
to go to the small lake that is located in the Kerberos desert (it is visible
on the map) and find the town on the North-Eastern shore (which isn't shown
on the map). This is Eratea and will be your base of operations for the
final part of the game:-
| 1. |
A healer (restores health
for a price and will sell herbs at 2000 Guilders for 5 herbs). |
| 2. |
Fang buyer (1 fang =
50 Guilders). |
| 3. |
Weaponsmith. |
| 4. |
Town Elder. For a donation
of 500 Guilders, you are told the following: "Fight all evil leaders to
be victorious!" |
| 5. |
The occupant tells you:
"At night the evil creatures howl like the fury of the wind!" |
| 6. |
The occupant tells you:
"Our poor town of Eratea is in ruins because of them!" |
| 7. |
The occupant tells you:
"Deliver us from our terrible suffering!" |
| 8. |
Shop:
| Knife |
3000 Guilders |
| Sword |
4000 Guilders |
| Armour |
5000 Guilders |
| Shield |
6000 Guilders |
|
|
|
The second key is also
in a hidden dungeon, sixteen squares West of the first one. Use the map
to find it then go there - it looks like a patch of bare desert. Search
and you shall find the way in by casting "Come, Iason".
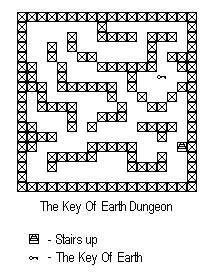 |
Once inside,
make your way to the treasure chest which holds the Key Of Earth. Along
the way you'll meet more creatures that you have already encountered, except
this time they'll be harder than those of the previous dungeon. These include
Barbeela, Itaks & Rohay, as well as the odd Senpi. The Senpi should
not present your party with any problems, as you are much tougher than
when you first used to meet them. The Key is guarded by a Sehod:
 |
Sehod. Use the same tactic
as you did on the Rokhod. When you win, you'll get 54 Fangs, The Key Of
Earth and lose 1000 Charisma. |
After your victory, make
your way out and head for Eratea. You'll have to go and replace any items
you have used. |
|
You should now be ready
to go for the last key. Head for a spot ten squares North of the dungeon
where you found the Key Of Earth. Here you will find another hidden monument.
In you go...
 |
You will be
familiar with the arrangement by now. The creatures you will meet in this
dungeon include Barbeela, Inutas and Hanj. The Hanj can be a nuisance as
they are still very powerful. Use a Stone Of Protection to stop their spells
then finish them off with your sword. Head for the key and you will find.....
 |
...an Ohod. Use a Stone
Of Protection to stop its spells and then use your weapons. You will probably
not need to use any magical items. |
You will gain the Key of
Hell upon defeating this beast as well as 58 Fangs, but you'll lose 1000
Charisma. Head back to the surface, and stock up on everything. You now
have all three keys that you need to complete the final part of the game. |
|
| Head back to where the
Key of Hell Dungeon is hidden, then go six squares (three days) West. Here
you will find another Monument hidden in the sand. Before you go in, you
will need to be sure that your party is strong enough. Check the picture
below and compare it to your party.
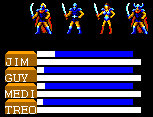
Notice that the maximum
health bar is below Treo. Your party will need to have attained this level
if it is to defeat Terrarin. If your party is not yet this strong you will
have to go in search of combat in order to build them up. If you need to
do this, I recommend the area to the West of the town of Tegea. If you
are this strong, then enter the Monument.
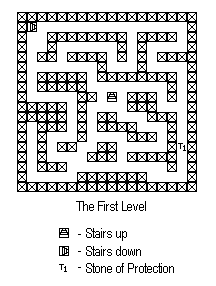 |
When you enter,
you will find yourself on Level 1 of a dungeon. Make your way to the stairs
down which are in the top-left hand corner of the map. Don't bother with
the Stone of Protection, you should have enough already. The denizens of
this level include Rohay, Abzal, Inutas, Agama and Hanj. Beware the Hanj
as you do not want to have to use up any magical items. Head down the stairs.... |
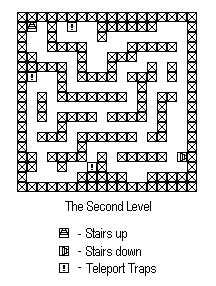
| ....and you'll find yourself
on the next level. The inhabitants of this place include Gijim, Inutas,
Skeletons (remember to use Guy) and Hanj. In addition there are further
hazards in the form of false stairs. Using these will teleport you to another
dungeon or the surface meaning you'll have to find your way back here again.
These are marked on the map as exclamation marks ( ! ). Make your way to
the real stairs at bottom-right. |
 |
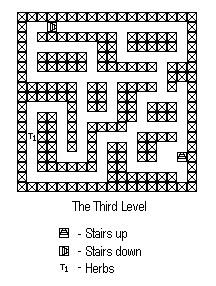 |
You now find yourself
on the third and final level. Creatures found here include Hirias, Gatanotow
and Barune. Don't head straight for the stairs going down, go for the Herbs
first. You'll notice that you now have 50 Herbs, more than enough to get
you to Terrarin. Now head for the stairs. Before you go down, heal up the
party to full health and check you have the following:
1 White Sphere
4 Staff of Earthquakes
11 Nuts
3 Potions
As many Stones of Protection
as possible.
Head down the stairs.
|
And that is where I am
going to leave you. The Final Battle is between you and Terrarin alone.
You have all that you need to win, both in knowledge and in material. Good
luck!

|
|