
MIRACLE WARRIORS - SEAL OF THE DARK LORD
Page 2 |
| Upon
returning to Oruk, you should purchase the services of the
weaponsmith. This will cost you 12000 Guilders, so if you don't have
that much money, you will need to fight the creatures of the plains
around Oruk. This will also help build up your experience, which in
turn will lead to an improvement in fighting ability and stamina.
Try and find an area where Great Lions may be found, but don't stray
too far - it's still early days and you could meet a creature that
is beyond your ability to defeat.
 Great
Lion - A good source of experience and cash at this stage of the
game. Great
Lion - A good source of experience and cash at this stage of the
game.
Once the
weaponsmith has joined you, you will no longer need to visit the
weaponsmiths in the towns or worry about weapons or armour
breaking from taking too many hits. Your new companion will keep
them all in top condition for no extra cost. Unfortunately, he
won't get involved in combat.

|
Having
drained your coffers, you will now need to refill them as the next
thing you need to do is purchase the Mask from the shop in Oruk.
This costs 15000 Guilders so its time to slay some more Great Lions.
Try not to sell any more fangs as you are going to need them
shortly. Once you have the Mask, you should head for the monument on
the edge of the forest in the region of Julus. Now that you have the
Mask you can see a little better in the darkness than you could
before, but the view is still poor.
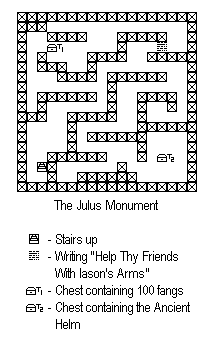 |
Some of
the creatures that you will encounter in the monument are
strong, so you should ensure you have a full complement of herbs
with you and have saved the game. Of particular note are the
Cavern Mantis & Orin. If you find it too difficult to
complete this monument then you will need to come back after
building up your Attack Strength & Defence Strength. You may
find it easier to complete the next section, Iris'
Axe, first, but you'll need 300 fangs. There is no
particular order in which these two sections need to be done,
but the contents of one of the chests in the Julus monument will
help you gain the Axe.
Inside
the monument you should head for chest T2 first & get the
Ancient Helm. This device enables you to read any
indecipherable writing you may find on the passage walls.
After finding the Helm, head for chest T1, going via the
passage with the writing on the wall and you should now be
able to read it thanks to the Helm, but the message isn't very
useful. At least you know the Helm works. Opening chest T1
will reveal 100 fangs, very useful for when you need to get
the axe. You've got everything now, so get out as quickly as
possible and head back to Oruk. |
|
Once back at
Oruk, get yourself healed & stock up on herbs. You'll need 300
fangs for the next bit so make sure you've got enough or almost
enough - you can pick up a few more on the way. Head South from
Oruk, across the plain of Ortygia and into the forest. You are
looking for a castle that isn't displayed on the map & you'll
find it on the coast. This should be the first time that you have
entered a forest and the creatures you find there are tougher than
those on the plains. The castle is only a few squares into the
forest however, so you should be ok - run away if you have to! One
creature you may encounter in the forest is the Liphant. These
strange creatures are a tough challenge for you at this stage of the
game - see the picture below. If you defeat one there is a chance
that it will be carrying some Sacred Nuts which you will be able to
take. These can be thrown at enemies to cause them damage - kind of
like a hand grenade. Liphants can be found in the forests of Arukas
and Marula.
 |
Liphant.
Found in the forests of Arukas & Marula, they are your
source of Sacred Nuts. |
Once you find
the castle, make sure you have the required number of fangs &
then enter. You will be greeted by the King of Marula, who will
exchange 300 fangs for Iris' Axe. This is the first of the Arms of
Legend and is to be wielded by you. It gives you a significant
boost in your attack strength. If you haven't been able to succeed
in the Julus monument yet, you should have better luck now! After
getting the axe, head North & back to Oruk. Heal your wounds &
stock up on herbs.
|
It is now
time to find your first companion, Guy. Leave Oruk and head South
West to the province of Baton. Avoid the woods that are shown on the
map in a darker green than normal. On the coast of Baton, you will
find a town that is not marked on the map. This
is Kadia, with the following locations:
| 1. |
A man
giving the towns name: "This is Kadia - We honour the God
of the Sea." |
| 2. |
A healer
(restores health for a price and will sell herbs at 2000
Guilders for 5 herbs). |
| 3. |
Fang
buyer (1 fang = 50 Guilders). |
| 4. |
Weaponsmith. |
| 5. |
Town
Elder. For a donation of 500 Guilders, you are told the
following: "To get a ship, though must first defeat the
Knight who lives in the Southern Woods." |
| 6. |
The
occupant tells you: "Hast thou found the Helm in the cave?" |
| 7. |
The
occupant tells you: "If thy fame is small, villages may
refuse thee." |
| 8. |
The
occupant tells you: "Many of us have fallen to the minions
of evil." |
| 9. |
Shop:
| Knife |
3000
Guilders |
| Sword |
4000
Guilders |
| Armour |
5000
Guilders |
| Shield |
6000
Guilders |
|
You must have
Iris' Axe for the next part to work. Visit the healer and you have
the option of casting the spell "Awake, Giant!". Do so
and Guy will join you:
"I am Guy,
I have waited long for thee! Here is one portion of the Ancient
Scroll. Complete the Scroll and the location of the Seal Of The
Dark Lord will be clear. Let us search for our second companion.
She is said to be in a town to the far South."
Now that Guy is
with you, go to the shop & purchase a shield & armour for
him. Don't bother purchasing a weapon for him - you are about to
get a better one for free. Make sure you are healed & stocked
up with herbs. A point about your companions that is worth
mentioning here is that they join your party at the level below
your current one. Therefore, if you are approaching the next
experience level then you should wait until you have achieved it
before collecting your next companion.
|
|
Guy's Sword, Minos &
The Village Of Restoration |
Head North
into Dirke. Skirt around the forest and mountains and you should
find the Apheidas Castle nestled there (a few squares East of the
town of Minos). On the way you'll meet some new creatures, if you
are really lucky, you might just come across a Gurol, though this is
rare.
 |
Gurol -
Easier to kill than you might think & yields 6000 Guilders,
24 fangs & +25 Character Points. |
You may also
meet the White Monks, who will give you advice and occasionally
heal wounds, and the Black Monks - these are really nasty to fight
and not really worth the effort. Fortunately, retreating from them
always works.
 |
Black
Monk - Tough opponents. If you defeat them you gain +200
Character Points. |
You should be
carrying at least 300 fangs when you enter the castle, or the King
won't help you. If you have the required number of fangs, they
will be exchanged for Turo's Sword which is weilded by Guy:
"Guy! Dost
noble blood flow in thy veins? A single blow can remove the evil
curse. Turo's Sword! Thou needst fear not the Forest of Curses."
Leave the
castle, head back around the mountains and forests and cross into
the region of Hierax via a bridge across the river. Let Guy do
most of the fighting to bring him up to the same level as
yourself. Head North from the bridge to the town of Minos which
contains the following:
| 1. |
A man
giving the towns name: "Welcome to Minos. How fare your
travels?" |
| 2. |
A healer
(restores health for a price and will sell herbs at 2000
Guilders for 5 herbs). |
| 3. |
Fang
buyer (1 fang = 50 Guilders). |
| 4. |
Weaponsmith. |
| 5. |
Town
Elder. For a donation of 500 Guilders, you are told the
following: "Wield the sword of Apeidas Castle and the curse
of a Knight will do no harm." |
| 6. |
The
occupant tells you: "Hast thou been trained with the sword
from the King in the village by the desert?" |
| 7. |
The
occupant tells you: "Face not alone the fearsome desert
beasts." |
| 8. |
The
occupant tells you: "I'm praying that our land will see
peace." |
| 9. |
Shop:
| Knife |
3000
Guilders |
| Sword |
4000
Guilders |
| Armour |
5000
Guilders |
| Shield |
6000
Guilders |
| Feather |
3000
Guilders |
|
At Minos, you
should get healed and stock up on herbs.
Worth
mentioning here are the Village of Restoration and the
Swordsmith's Village. The Village of Restoration can be found in
the mountains North of Penteus. At this village you can bring any
dead character back to life for 30000 Guilders. The Swordsmith's
Village is in Hierax, on the edge of the desert, several squares
south-west of the town of Minos. Here you can improve your ability
with weapons in exchange for 60000 Guilders per character. You
really should spend the time and money to upgrade yourself and Guy
before you try the next section.....
|
Head back
South towards the Kadmos peninsula & into the forest marked in a
darker green than any other forest on the map. Pass through it and
as you step onto the narrow (one square wide) peninsula, you will
encounter a skeleton. This is the Knight of the Southern Woods who
was mentioned by a townsman you met earlier. He is normally quite
tough to beat, but a combination of Guy & Turo's sword will
finish him off after only a few attacks if Guy is strong enough.
 |
The
Knight. Guy can finish him off easily with Turo's sword for 4
fangs and +100 character points. |
If not, build
up Guy to the next level by fighting in the forests where Liphants
can be found. The forest North of Penteus can be quite profitable
as it also contains Kokins. The Sacred Nuts from the Liphants will
also help you defeat the Knight.
 |
Kokin.
Worth 8000 Guilders, 25 fangs and +25 character points. Not
difficult to beat at this stage of the game. |
Once the
Knight is defeated, head South again and you will find a village
in Kadmos which is not marked on the map. At this village you can
purchase a boat for 30000 Guilders. This is the Argo and can be
used to cross any water except the Sea of Areos. If you attempt to
enter the Sea of Areos, you won't be allowed. Use the boat now to
cross the sea of Julus and land on the continent of Eratos.
Beware the sea creatures as they will be some of the toughest you
have come across yet.
|
|
Torif & The Staff Of
Earthquakes |
Once on
Eratos, head for the town of Torif for the usual healing, stocking
up of herbs and gathering of clues:
| 1. |
A man
giving the towns name. |
| 2. |
A healer
(restores health for a price and will sell herbs at 2000
Guilders for 5 herbs). |
| 3. |
Fang
buyer (1 fang = 50 Guilders). |
| 4. |
Weaponsmith. |
| 5. |
Town
Elder. For a donation of 500 Guilders, you are told the
following: "I have heard of youths with crystals going to
the misty caverns." |
| 6. |
The
occupant tells you: "Great storms rage around Areos." |
| 7. |
The
occupant tells you: "Art though the long awaited Miracle
Warriors?" |
| 8. |
The
occupant tells you: "Take me with you? I'll only hinder
you." |
| 9. |
Shop:
| Knife |
3000
Guilders |
| Sword |
4000
Guilders |
| Armour |
5000
Guilders |
| Shield |
6000
Guilders |
| Feather |
3000
Guilders |
|
Leave Torif
and head West and South to the land of Karme. Here you will find a
village where you can purchase the Staff Of Earthquakes for 10000
Guilders. Up to 4 may be purchased at a time. The creatures of
this land offer the prospect of great riches - but some are very
dangerous. Of particular note are the Gurol's (see
earlier if you haven't already met one) and
the following two:
 |
Agama. A
two headed dragon with spellcasting ability. A tricky beast to
defeat, but yields 5000 Guilders, 34 fangs and +35 character
points. |
 |
Egara.
Easy to kill, causing very little damage to your party. Killing
one gains you 3000 Guilders, 20 fangs and +25 character points. |
Once you have
your quota of the Staff Of Earthquakes you need to head for the
town of Menos. This is not shown on the map supplied with the
game, but is found on the Easternmost tip of Decuma in Apheidas,
on the coast of the Kallipolis Sea - a long way from where you are
now. On the journey back take the opportunity to visit some
forests and stock up fully on Sacred Nuts - your'e going to need
them.....
|
|
Menos & The Armour Of
Kronos |
When you
reach Menos, take the opportunity to fully heal your party and pick
up a few clues:
| 1. |
A man
giving the towns name: "This town is known as Menos." |
| 2. |
A healer
(restores health for a price and will sell herbs at 2000
Guilders for 5 herbs). |
| 3. |
Fang
buyer (1 fang = 50 Guilders). |
| 4. |
Weaponsmith. |
| 5. |
Town
Elder. For a donation of 500 Guilders, you are told the
following: "A staff found in Eratos will help thee kill the
creatures guarding the Armour Of Legend." |
| 6. |
The
occupant tells you: "The Liphants of Arukas feed on Sacred
Nuts." |
| 7. |
The
occupant tells you: "Be cautious: Slay a creature native to
the caves and thou will gain ill repute." |
| 8. |
The
occupant tells you: "Thy worthiness to Iason shows in thine
eyes." |
| 9. |
Shop:
| Knife |
3000
Guilders |
| Sword |
4000
Guilders |
| Armour |
5000
Guilders |
| Shield |
6000
Guilders |
|
When all is
as it should be, leave Menos and head West into the mountains. You
will quickly find a cave which you should enter. You will
immediately be confronted by the guardian of the cave - the Senpi.
 |
Senpi.
The toughest beast you've faced yet. Killing it gives you no
reward except whatever it is guarding. You also lose 500
character points. |
You'll need
to use your magic items initially, the Sacred Nuts and the Staff
of Earthquakes. This should weaken the Senpi enough for you and
Guy to finish it off with your weapons. The Senpi were set to
guard the Armour of Legend by the White Monks, to prevent them
falling into the wrong hands. Unfortunately they do not understand
that the time has come for the Armour to be used and so you have
no choice but to slay them. This is why you lose character points
- you are killing a creature opposed to Terarin's invasion, placed
there by the forces of good. Your reward for all this effort is to
be presented with the Armour Of Kronos. This armour is for your
character. Return to Menos to nurse any wounds you may have,
which, if you have used a full complement of Staff's and Nuts
shouldn't be too many.
|
Once you
have the Armour of Kronos, head East into the woods where Liphants
can be found to replenish your supplies of Sacred Nuts. Remember
that you can hold a maximum of eleven, but you gain them in bunches
of three. You will therefore need to use one before you can gain
your full total. Once you have eleven, head back South and get 4
Staff's from the village in Karme. Now head East to the town of
Doris, South-East of the Silvius desert. Enter the town:
| 1. |
A man
giving the towns name: "This is the long prosperous port of
Doris." |
| 2. |
A healer
(restores health for a price and will sell herbs at 2000
Guilders for 5 herbs). |
| 3. |
Fang
buyer (1 fang = 50 Guilders). |
| 4. |
Weaponsmith. |
| 5. |
Town
Elder. For a donation of 500 Guilders, you are told the
following: "Iason's arms are kept in Apeidas (sic)
mountains." |
| 6. |
The
occupant tells you: "Didst though get a magic mantle in the
cavern?" |
| 7. |
The
occupant tells you: "The stone of protection works on
spells." |
| 8. |
The
building has a blue roof. Inside there is a dancer. |
| 9. |
Shop:
| Knife |
3000
Guilders |
| Sword |
4000
Guilders |
| Armour |
5000
Guilders |
| Shield |
6000
Guilders |
|
Go to the
building with the blue roof and enter. You must have gained the
Armour of Kronos for the next part to work. Cast the spell "Awake,
Giant" and Medi will join you. "I am Medi! Here is my
portion of the scroll. Our final companion has been changed to a
beast by the Black Monks."
|
|